
devDiary 0.3: Everybody Loves Raycasting
6 July 2025 at 02:14:30 pm NZSTTo give clarity on the goal, here is raycasting summed up in one diagram:
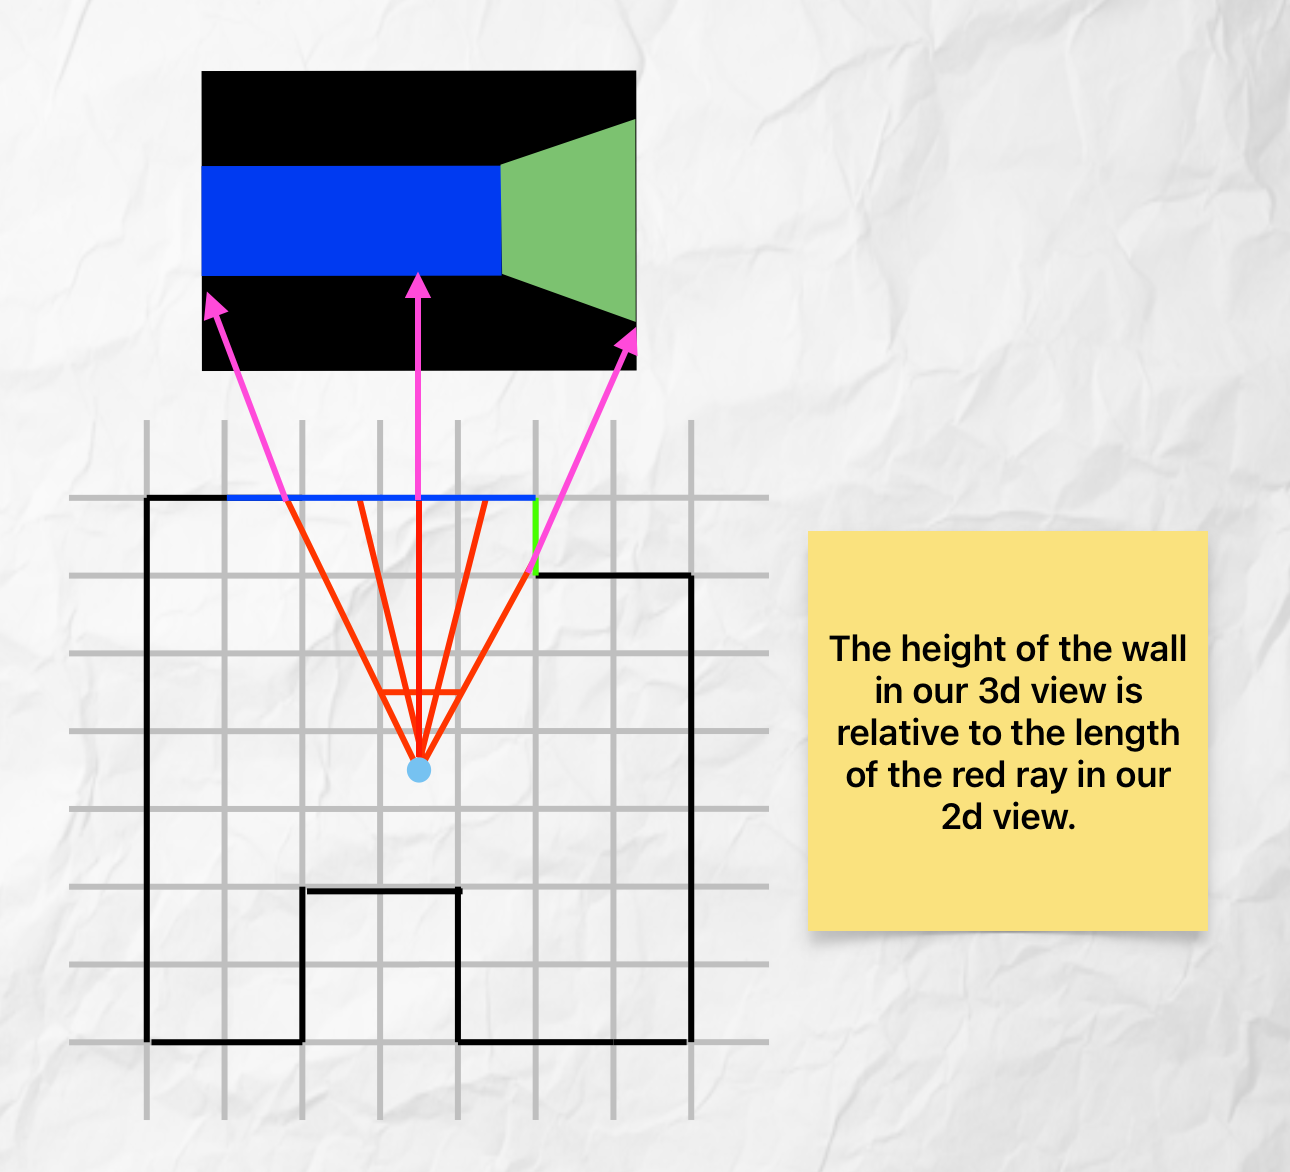 The Final Goal
On the top is the final 3D projection, and on the bottom is how this effect is created. You can see on the bottom the world is actually 2D; everything lives on a grid. Note how the ray that intersects the green wall is shorter than the others, and as a result, the green wall appears closer in the 3D view. The keen eyed might notice that the leftmost ray is longer than the centre ray, and therefore the blue wall should be smaller on the left! You would be absolutely correct, and the most basic raycasters do have this fisheye effect; which means even when looking at a flat wall, it appears closer/larger in the middle. Thankfully, there are some crafty tricks we can employ later on to correct this.
One of the neat parts of raycasting is that floors and ceilings are more of an illusion than geometry. All we have to do is find the height of the walls, and fill in the the top and the bottom with any colour we desire to create the floor and ceiling surfaces.
Hopefully any other questions you have are cleared up as the program takes shape. Time to get our hands dirty with some code! I’ll start by defining our camera and our world.
#define MAP_WIDTH 20
#define MAP_HEIGHT 20
#define WORLD_SCALE 64

typedef struct {
    double x;
    double y;
    double theta;
} camera;

int8_t map[MAP_HEIGHT][MAP_WIDTH] = {
    {1, 1, 1, 1, 1, 1, 1, 1, 1, 1, 1, 1, 1, 1, 1, 1, 1, 1, 1, 1},
    {1, 0, 0, 0, 0, 0, 0, 0, 0, 0, 0, 0, 0, 1, 0, 0, 0, 0, 0, 1},
    {1, 0, 0, 0, 0, 0, 0, 0, 0, 0, 0, 0, 0, 1, 0, 0, 0, 0, 0, 1},
    {1, 0, 0, 1, 1, 0, 0, 0, 0, 0, 0, 0, 0, 1, 0, 0, 0, 0, 0, 1},
    {1, 0, 0, 1, 1, 0, 0, 0, 0, 0, 0, 0, 0, 1, 0, 0, 0, 0, 0, 1},
    {1, 0, 0, 0, 0, 0, 0, 0, 0, 0, 0, 0, 0, 1, 1, 1, 0, 1, 1, 1},
    {1, 0, 0, 0, 0, 0, 0, 0, 0, 0, 0, 0, 0, 0, 0, 0, 0, 0, 0, 1},
    {1, 0, 0, 1, 1, 0, 0, 0, 0, 0, 0, 0, 0, 0, 0, 0, 0, 0, 0, 1},
    {1, 0, 0, 1, 1, 0, 0, 0, 0, 0, 0, 0, 0, 0, 0, 0, 0, 0, 0, 1},
    {1, 0, 0, 0, 0, 0, 0, 0, 0, 0, 0, 0, 0, 0, 0, 0, 0, 0, 0, 1},
    {1, 0, 0, 0, 0, 0, 0, 0, 0, 0, 0, 0, 0, 0, 0, 0, 0, 0, 0, 1},
    {1, 0, 0, 1, 1, 0, 0, 0, 0, 0, 0, 0, 0, 0, 0, 0, 0, 0, 0, 1},
    {1, 0, 0, 1, 1, 0, 0, 0, 0, 0, 0, 0, 0, 0, 0, 0, 0, 0, 0, 1},
    {1, 0, 0, 0, 0, 0, 0, 0, 0, 0, 0, 0, 0, 0, 0, 0, 0, 0, 0, 1},
    {1, 0, 0, 0, 0, 0, 0, 0, 0, 0, 0, 0, 0, 0, 0, 0, 0, 0, 0, 1},
    {1, 0, 0, 0, 0, 0, 0, 0, 0, 0, 0, 0, 0, 0, 0, 0, 0, 0, 0, 1},
    {1, 0, 0, 0, 0, 0, 0, 0, 0, 0, 0, 0, 0, 0, 0, 0, 0, 0, 0, 1},
    {1, 0, 0, 0, 0, 0, 0, 0, 0, 0, 0, 0, 0, 0, 0, 0, 0, 0, 0, 1},
    {1, 0, 0, 0, 0, 0, 0, 0, 0, 0, 0, 0, 0, 0, 0, 0, 0, 0, 0, 1},
    {1, 1, 1, 1, 1, 1, 1, 1, 1, 1, 1, 1, 1, 1, 1, 1, 1, 1, 1, 1}
};
The world will be stored as a 2D binary array. Each entry represents a grid square of 64 * 64 units. ‘0’s represent empty space, and ‘1’s represent a solid square of 64*64 units. If you look closely I’ve created a small room in the top right, and 3 columns on the left.
 Angle Calculations
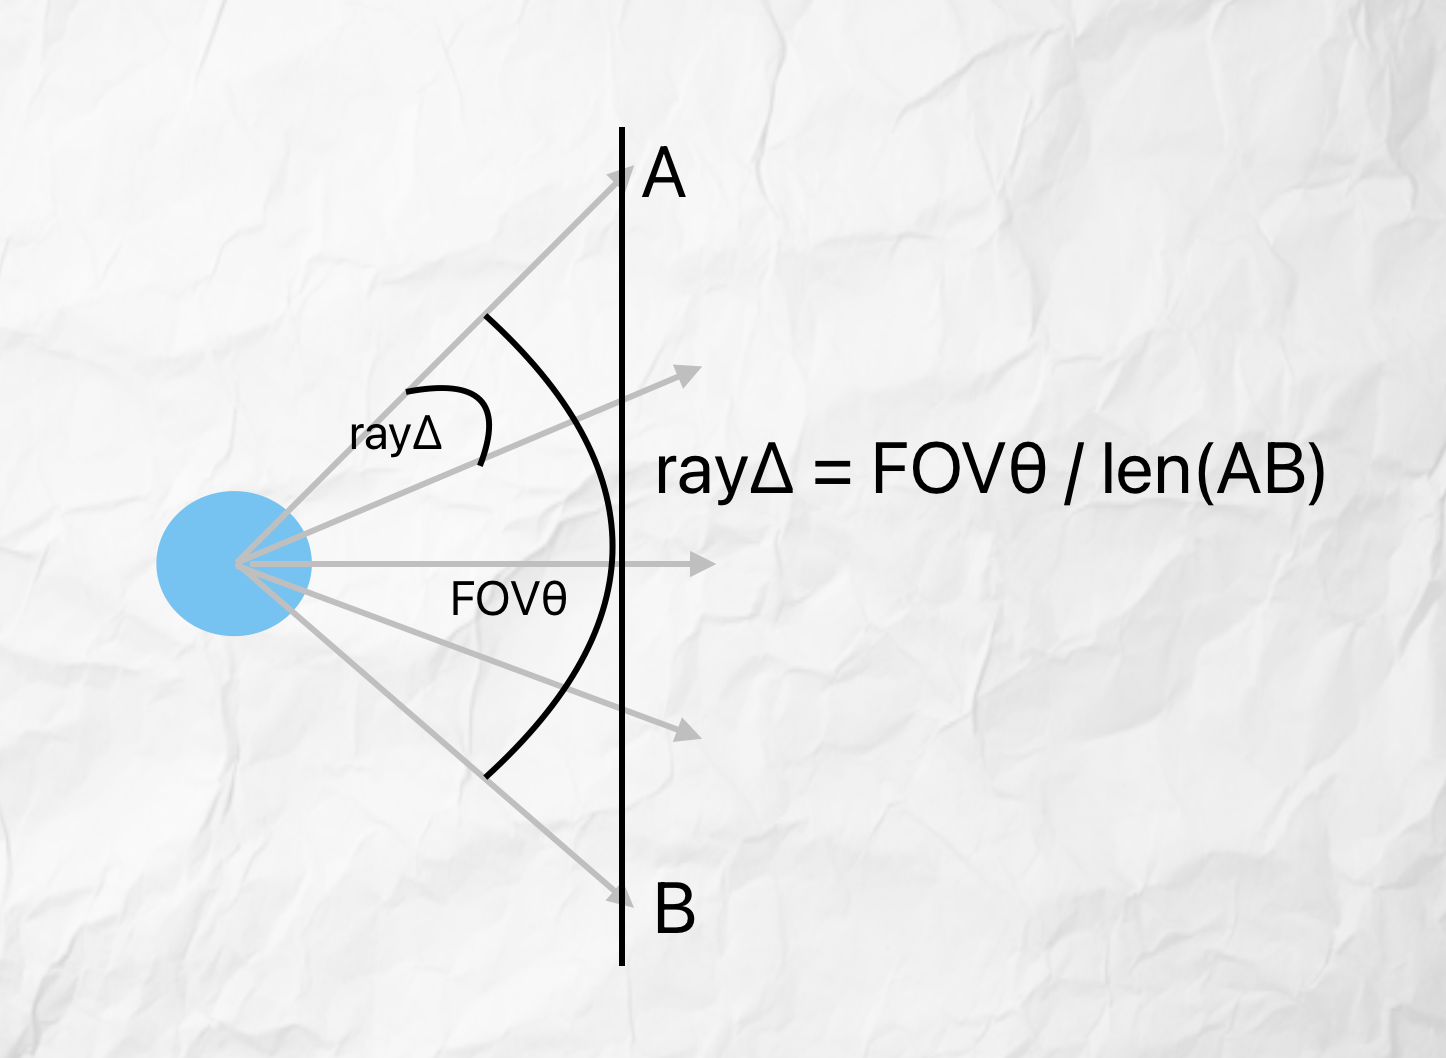
When creating an SDL window you have to define the window size in pixels, I chose 320 x 240px for a 4:3 aspsect ratio. The basic idea from the image above, is that you shoot rays from A to B, the left edge to the right edge of the screen, one for each pixel width. Each ray needs to be offset by a rayΔ, found by the given formula, which is easily derived. A standard field of view (FOVθ) for a first person camera is 90 degrees, and the length of AB is our screen width, 320. I’ll be using this ray delta later.
 Ray collisions
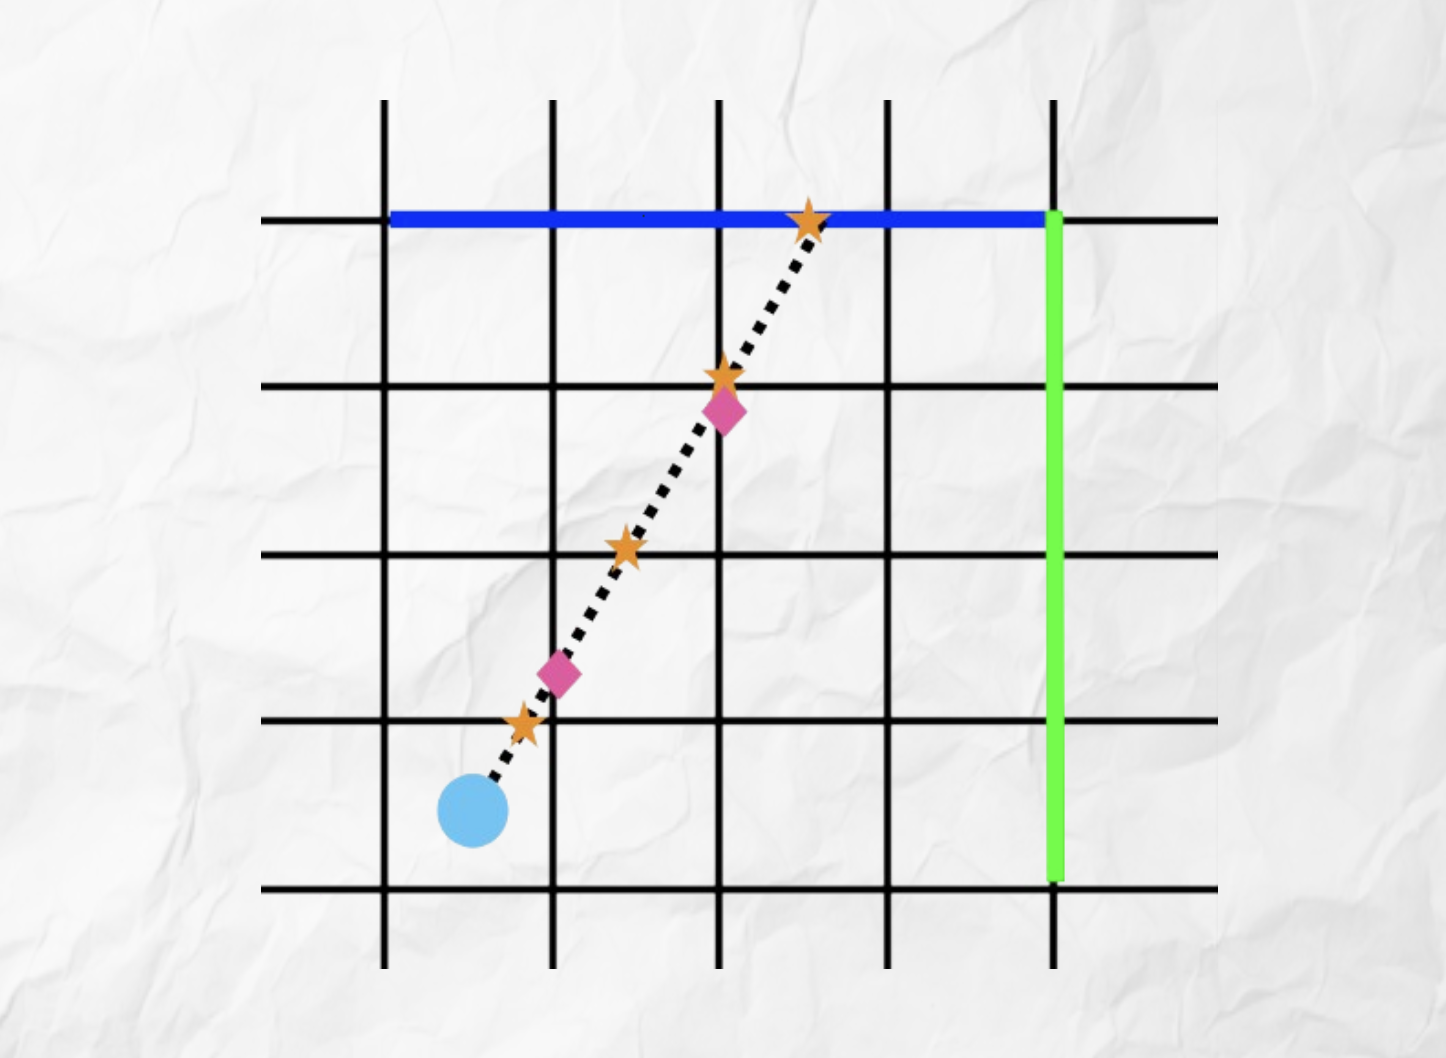
Rather than checking if each ray has hit a wall every unit it advances, instead you can check only where they intersect on a horizontal or vertical grid line. This is because this is the only place that walls can be placed. In the figure above, you can see the ray intersects with horizontal lines at the orange stars, and vertical lines at the pink diamonds.